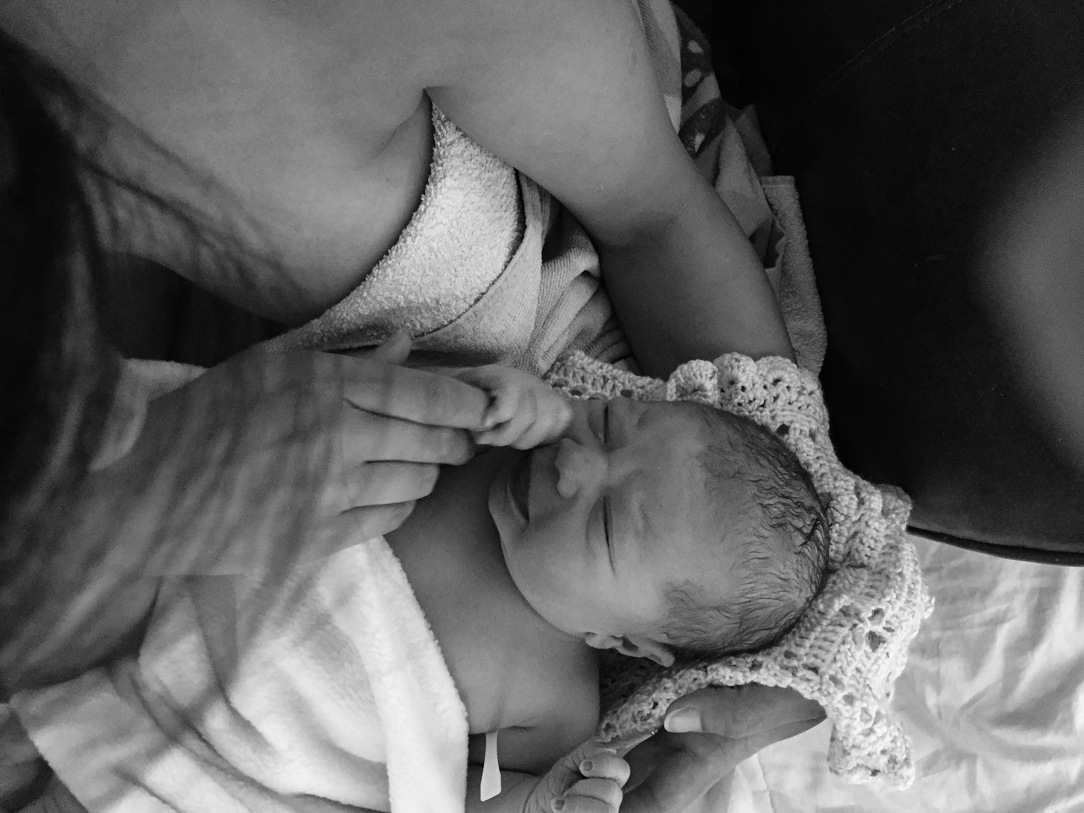
Baby J is seven months old. He now weighs 19lb 12oz and is 71cm long.

After mastering how to roll in both directions last month, J is now rolling about everywhere! He whizzes across the room to get what he wants. He still sleeps in our bedroom, but I have now put the side back on his cotbed as he keeps rolling into me. Also I’m worried that he might roll all the way across and out of the bed when I’m not there, as he goes up to bed around 7pm now.
He has also mastered another new skill: he can sit up without support! He can’t get himself into the sitting position, but he can hold himself if he’s placed there. This has opened up a whole new world of toys and exploring for him!
His babbling has increased and he has added “dadada” to his vocabulary along with “bababa” which he started saying last month. We’re not counting this as a first word yet though, as it’s just babbling, he hasn’t actually said “dada” in context [strict mum alert].
J is doing really well since starting solid food, he eats so much and eats so well! I’ll be doing separate posts all about his weaning adventures, but in the meantime you can check out our essential baby-led weaning equipment guide or read about Little N’s baby-led weaning journey.
I’ve been having a look about for a new car seat for J. He’s still in his infant car seat which is fine as he isn’t too big or too heavy yet, but I don’t use it on the pram base anymore so I was thinking about getting a combination seat now. Little N has the Joie Stages as I’d like him to rear-face for as long as possible. I’ve realised that my car has ISOFIX so does Ian’s so I had a look at some ISOFIX seats. I found it all very confusing though. We’re going to be changing cars in the next year so I need a seat that fits three different types of car which seems impossible. We’ll either need a variety of car seats or I might just get another Joie Stages.
As for me I’m enjoying taking care of myself more now I have a bit of time in the evenings. Until recently I had either been rushing my make-up off or sleeping in it [I know, I know!] But now I have been taking the time to do a proper double cleanse and apply serums and oils before moisturising. I’ve even been using toner, which is always something I skip if I’m in a rush. I’ll write a post soon to show you the lovely products I currently use.
Also, I’ve finally lost all of my pregnancy weight. Woo! After Little N was born I didn’t have a car so was walking everywhere. This time I’m driving everywhere and it has really made a difference to how quickly [or slowly] I’ve lost weight. A couple of weeks ago I treated myself to a few new items from New Look, including some skinny jeans. I bought them in my usual size, with the aim of slimming into them, but they actually fit me perfectly. Yippee!
Missed an update? Catch up with Baby J’s One Month, Two Month, Three Month, Four Month, Five Month and Six Month updates, and read my birth stories here: The Emergency C-Section and The VBAC
Baby J is Seven Months Old
Baby J is seven months old. He now weighs 19lb 12oz and is 71cm long.
After mastering how to roll in both directions last month, J is now rolling about everywhere! He whizzes across the room to get what he wants. He still sleeps in our bedroom, but I have now put the side back on his cotbed as he keeps rolling into me. Also I’m worried that he might roll all the way across and out of the bed when I’m not there, as he goes up to bed around 7pm now.
He has also mastered another new skill: he can sit up without support! He can’t get himself into the sitting position, but he can hold himself if he’s placed there. This has opened up a whole new world of toys and exploring for him!
His babbling has increased and he has added “dadada” to his vocabulary along with “bababa” which he started saying last month. We’re not counting this as a first word yet though, as it’s just babbling, he hasn’t actually said “dada” in context [strict mum alert].
J is doing really well since starting solid food, he eats so much and eats so well! I’ll be doing separate posts all about his weaning adventures, but in the meantime you can check out our essential baby-led weaning equipment guide or read about Little N’s baby-led weaning journey.
I’ve been having a look about for a new car seat for J. He’s still in his infant car seat which is fine as he isn’t too big or too heavy yet, but I don’t use it on the pram base anymore so I was thinking about getting a combination seat now. Little N has the Joie Stages as I’d like him to rear-face for as long as possible. I’ve realised that my car has ISOFIX so does Ian’s so I had a look at some ISOFIX seats. I found it all very confusing though. We’re going to be changing cars in the next year so I need a seat that fits three different types of car which seems impossible. We’ll either need a variety of car seats or I might just get another Joie Stages.
As for me I’m enjoying taking care of myself more now I have a bit of time in the evenings. Until recently I had either been rushing my make-up off or sleeping in it [I know, I know!] But now I have been taking the time to do a proper double cleanse and apply serums and oils before moisturising. I’ve even been using toner, which is always something I skip if I’m in a rush. I’ll write a post soon to show you the lovely products I currently use.
Also, I’ve finally lost all of my pregnancy weight. Woo! After Little N was born I didn’t have a car so was walking everywhere. This time I’m driving everywhere and it has really made a difference to how quickly [or slowly] I’ve lost weight. A couple of weeks ago I treated myself to a few new items from New Look, including some skinny jeans. I bought them in my usual size, with the aim of slimming into them, but they actually fit me perfectly. Yippee!
Missed an update? Catch up with Baby J’s One Month, Two Month, Three Month, Four Month, Five Month and Six Month updates, and read my birth stories here: The Emergency C-Section and The VBAC
Baby-led weaning is a lot more popular this time round than when I was weaning my first son 2 years ago.
Back then, I think I was the only one out of my “due in” group that chose baby-led weaning. The other mums chose to wean with purees or started with purees before moving onto finger food a bit later. I also didn’t know any other mums in real life that were weaning this way.
This time around, baby-led weaning seems to be the more popular choice. I don’t get raised eyebrows, or exclamations of “oh my god, won’t he choke on that?!” or looked at like I am a little bit crazy to be offering my baby normal food.
One of the great things about baby-led weaning is that you don’t need any special equipment. You just need your baby and some food! That said though, here are some things which I found to be really, really helpful:
1. BOOK
If you’re not sure where to start with baby-led weaning, then Baby-Led Weaning by Gill Rapley is a fantastic choice of book. It explains everything: the hows, the whens and the whys, and gives some great ideas for foods to try. It’s also very reassuring, as the thought of giving solid food was bit scary for me! I first read this book when I was weaning Little N, and dug it out again to refresh my memory before J started on solid food.

2. HIGHCHAIR
J has the Light Wood High Chair from innovative French brand Babymoov. This high chair is particularly great for baby-led weaning because all the parts can be completely removed, even the straps, making cleaning up after mealtimes a doddle.
The seat and footrest can be adjusted so as J gets bigger I’ll be able to change the position. What I REALLY love about this high chair is how compact it is when folded – it folds quickly and easily to just 15cm wide, and there is no need to remove the tray because that folds down too. This means that I can tuck the high chair away and free up lots of space in between mealtimes!
3. BIBS
As J is still so young and his hand-eye coordination is still developing, he has a tendency to drop food. Also, banana stains are impossible to remove. So bibs are very much an essential! I really rate the Coverall Bibs from Close Parent. These washable long-sleeved bibs keep J covered from his neck to his knees and have a crumb-catcher for any food he drops.
When we’re out and about, I prefer the Roll n Go Explora Bibs from Tommee Tippee. As the name suggests these bibs can be rolled up small for on the go. They also have the crumb-catcher for any spillages and they can be wiped clean which is handy when we’re on the go.
4. STORAGE BOWLS
Rather than cook a little bit of food each mealtime for J, I cook a larger quantity that I can then take out with us or store in the fridge/freezer for another day. These Babybowls from Babymoov are perfect for this purpose. Each bowl has a 250ml capacity and comes with a colour-coordinated airtight lid. They are BPA-free and are microwave-safe and dishwasher-safe. The measurement markings on the side also mean these bowls are great for sauces, etc..
5. SOFT SPOUTED SIPPY CUP
I I tried lots of different sippy cups when I was weaning Little N. The ones I found he got on best with when he first started having water were the Nuby soft spouted sippy cups. They have two handles so great for little ones who are still perfecting their grip and the soft spout is gentle on their gums.

6. CROCKERY AND CUTLERY
Isn’t that the cutest little plate and fork ever? They’re part of the Lovely Bear Lunch Set by Babymoov. It also comes with a little spoon, a bowl and a cup. They’re all made from melamine and are BPA-free, and they’re dishwasher-safe and microwave-safe. I don’t expect J to be able to use his fork and spoon yet but I think it’s good for him to explore and hopefully he will learn to copy us. I did the same with Little N and he was able to use his cutlery from a very young age.
What are your weaning essentials?

Disclosure: The lovely Babymoov products were provided as part of the ambassador relationship, however all thoughts and opinion are my own.
Baby-Led Weaning Essentials
Baby-led weaning is a lot more popular this time round than when I was weaning my first son 2 years ago.
Back then, I think I was the only one out of my “due in” group that chose baby-led weaning. The other mums chose to wean with purees or started with purees before moving onto finger food a bit later. I also didn’t know any other mums in real life that were weaning this way.
This time around, baby-led weaning seems to be the more popular choice. I don’t get raised eyebrows, or exclamations of “oh my god, won’t he choke on that?!” or looked at like I am a little bit crazy to be offering my baby normal food.
One of the great things about baby-led weaning is that you don’t need any special equipment. You just need your baby and some food! That said though, here are some things which I found to be really, really helpful:
1. BOOK
If you’re not sure where to start with baby-led weaning, then Baby-Led Weaning by Gill Rapley is a fantastic choice of book. It explains everything: the hows, the whens and the whys, and gives some great ideas for foods to try. It’s also very reassuring, as the thought of giving solid food was bit scary for me! I first read this book when I was weaning Little N, and dug it out again to refresh my memory before J started on solid food.
2. HIGHCHAIR
J has the Light Wood High Chair from innovative French brand Babymoov. This high chair is particularly great for baby-led weaning because all the parts can be completely removed, even the straps, making cleaning up after mealtimes a doddle.
The seat and footrest can be adjusted so as J gets bigger I’ll be able to change the position. What I REALLY love about this high chair is how compact it is when folded – it folds quickly and easily to just 15cm wide, and there is no need to remove the tray because that folds down too. This means that I can tuck the high chair away and free up lots of space in between mealtimes!
3. BIBS
As J is still so young and his hand-eye coordination is still developing, he has a tendency to drop food. Also, banana stains are impossible to remove. So bibs are very much an essential! I really rate the Coverall Bibs from Close Parent. These washable long-sleeved bibs keep J covered from his neck to his knees and have a crumb-catcher for any food he drops.
When we’re out and about, I prefer the Roll n Go Explora Bibs from Tommee Tippee. As the name suggests these bibs can be rolled up small for on the go. They also have the crumb-catcher for any spillages and they can be wiped clean which is handy when we’re on the go.
4. STORAGE BOWLS
Rather than cook a little bit of food each mealtime for J, I cook a larger quantity that I can then take out with us or store in the fridge/freezer for another day. These Babybowls from Babymoov are perfect for this purpose. Each bowl has a 250ml capacity and comes with a colour-coordinated airtight lid. They are BPA-free and are microwave-safe and dishwasher-safe. The measurement markings on the side also mean these bowls are great for sauces, etc..
5. SOFT SPOUTED SIPPY CUP
I I tried lots of different sippy cups when I was weaning Little N. The ones I found he got on best with when he first started having water were the Nuby soft spouted sippy cups. They have two handles so great for little ones who are still perfecting their grip and the soft spout is gentle on their gums.
6. CROCKERY AND CUTLERY
Isn’t that the cutest little plate and fork ever? They’re part of the Lovely Bear Lunch Set by Babymoov. It also comes with a little spoon, a bowl and a cup. They’re all made from melamine and are BPA-free, and they’re dishwasher-safe and microwave-safe. I don’t expect J to be able to use his fork and spoon yet but I think it’s good for him to explore and hopefully he will learn to copy us. I did the same with Little N and he was able to use his cutlery from a very young age.
What are your weaning essentials?
Disclosure: The lovely Babymoov products were provided as part of the ambassador relationship, however all thoughts and opinion are my own.

Soothers, or dummies, or pacifiers, call them what you will, they can be a godsend. One thing about them that is a total pain in the backside, however, is keeping them clean and sterilised.
With my first baby, I had about 5 dummies on the go at any one time. Why so many? Because babies tend to drop them. Often. And when they drop them you have to clean and sterilise them again. So what I did was have 5 dummies all sterilised ready to go so that when N dropped one, I already had another ready. It was still a pain having to fill the steriliser each day though.
Fast forward to my second baby, and my discovery of the Milton Mini Portable Soother Steriliser. As the name suggests, it’s a dinky little steriliser from trusted baby care brand Milton, which is just the right size to fit one soother.

The Milton Mini enables me to clean and sterilise a soother on the go. It comes with 10 mini sterilising tablets, which can also be purchased separately. I simply fill the steriliser with cold water and add a tablet.
Then inside the steriliser are two sponges, one of which has a hole. These sponges absorbs the sterilising solution, meaning you just pop the soother in, twist it to clean then wait for 15 minutes for it to be sterilised.
The solution sterilises in only 15 minutes and kills 99.9% of germs. The solution works for 24 hours, so it only needs changing once per day and can be used as many times as needed in that period. The soother can be kept in the steriliser for up to 24 hours and will remain sterile.
Milton’s sterilising solution is safe for babies (it’s the same active ingredient that's used to make water drinkable) and doesn’t leave any taste so there’s no need to rinse the soother before using, just shake off any excess fluid.
The handy velcro strap makes it easy to attach to my pram or changing bag so I don’t have to rummage around looking for a clean soother, It’s a really clever, convenient product and saves a lot of space as well as time, and gives me the reassurance of knowing that J’s soothers are germ-free.

The Milton Mini Portable Soother Steriliser is available in three colours: blue, green and purple. It costs £6.99 and can be bought from John Lewis, Boots, Toys’r’Us and Mothercare, plus supermarkets and other online retailers.
Disclosure: I was sent the steriliser to review, however all thoughts and opinion are my own.
REVIEW: Milton Mini Portable Soother Steriliser
Soothers, or dummies, or pacifiers, call them what you will, they can be a godsend. One thing about them that is a total pain in the backside, however, is keeping them clean and sterilised.
With my first baby, I had about 5 dummies on the go at any one time. Why so many? Because babies tend to drop them. Often. And when they drop them you have to clean and sterilise them again. So what I did was have 5 dummies all sterilised ready to go so that when N dropped one, I already had another ready. It was still a pain having to fill the steriliser each day though.
Fast forward to my second baby, and my discovery of the Milton Mini Portable Soother Steriliser. As the name suggests, it’s a dinky little steriliser from trusted baby care brand Milton, which is just the right size to fit one soother.
The Milton Mini enables me to clean and sterilise a soother on the go. It comes with 10 mini sterilising tablets, which can also be purchased separately. I simply fill the steriliser with cold water and add a tablet.
Then inside the steriliser are two sponges, one of which has a hole. These sponges absorbs the sterilising solution, meaning you just pop the soother in, twist it to clean then wait for 15 minutes for it to be sterilised.
The solution sterilises in only 15 minutes and kills 99.9% of germs. The solution works for 24 hours, so it only needs changing once per day and can be used as many times as needed in that period. The soother can be kept in the steriliser for up to 24 hours and will remain sterile.
Milton’s sterilising solution is safe for babies (it’s the same active ingredient that's used to make water drinkable) and doesn’t leave any taste so there’s no need to rinse the soother before using, just shake off any excess fluid.
The handy velcro strap makes it easy to attach to my pram or changing bag so I don’t have to rummage around looking for a clean soother, It’s a really clever, convenient product and saves a lot of space as well as time, and gives me the reassurance of knowing that J’s soothers are germ-free.
The Milton Mini Portable Soother Steriliser is available in three colours: blue, green and purple. It costs £6.99 and can be bought from John Lewis, Boots, Toys’r’Us and Mothercare, plus supermarkets and other online retailers.
Disclosure: I was sent the steriliser to review, however all thoughts and opinion are my own.
My April beauty box from Birchbox has arrived and it is so, so, SO good this month! Birchbox have collaborated with Tatler to create a limited edition box which is gorgeous and packed with five luxe beauty samples, plus an extra bonus product.

Laura Mercier Full Blown Volume Supreme Mascara (5.7g) Once again this month we had the option to choose which of the Laura Mercier products we’d like (out of mascara, foundation and eye pencil). I chose the mascara as it’s my must-have make-up item and I love to try new ones. Plus, I am always running out!
Liz Earle Cleanse & Polish Hot Cloth Cleanser (30ml) and muslin cloth I do love this cleanser. I’m a bit of a product tart and always change up my routine. But this cleanser is one that I often come back to, especially as I like to double it up as a face masque.
Percy & Reed Smoothed, Sealed & Sensational Volumising No Oil Oil (30ml) I am all about volumising products at the moment since getting my hair cut shorter. You only need 1 or 2 drops of this oil – which smells fricking amazing by the way – so this bottle will last ages!
Lola Barcelona Nail Polish in Garcia (8ml) This hot fuschia shade has been created exclusively for Birchbox. I’ve never tried a Lola Barcelona polish before, but the shade is perfect for sunny spring days.
Pommade Divine Nature’s Remedy Balm (7ml) Another brand that is totally new to me. I love multi-purpose balms; you always find one in my bag. They are so handy for chapped lips, dry cuticles, I even use them as nappy creams! This one is 97% natural, smells great and feels lovely.
Inner Me Energise Me Vitamins (28 day supply) This is the bonus product and a perfect one for me! Running around after my two boys every day means I often forget to eat, or dont have time to eat well, so I do rely on supplements to make sure I’m getting all the vitamins my body needs. Especially vitamin D which is important for breastfeeding mothers.
I’m super happy with my Birchbox this month, I love everything, REALLY love it! Did you get a box this month? Did you get anything different? What do you think of it?
If you like the look of it and want to sign up, feel free to use my referral link: birchbox.co.uk/invite/SianG. You’ll get 50 Birchbox points, equivalent to £5! The box costs £10 per month plus p+p.
Birchbox – April Beauty Box
My April beauty box from Birchbox has arrived and it is so, so, SO good this month! Birchbox have collaborated with Tatler to create a limited edition box which is gorgeous and packed with five luxe beauty samples, plus an extra bonus product.
Laura Mercier Full Blown Volume Supreme Mascara (5.7g) Once again this month we had the option to choose which of the Laura Mercier products we’d like (out of mascara, foundation and eye pencil). I chose the mascara as it’s my must-have make-up item and I love to try new ones. Plus, I am always running out!
Liz Earle Cleanse & Polish Hot Cloth Cleanser (30ml) and muslin cloth I do love this cleanser. I’m a bit of a product tart and always change up my routine. But this cleanser is one that I often come back to, especially as I like to double it up as a face masque.
Percy & Reed Smoothed, Sealed & Sensational Volumising No Oil Oil (30ml) I am all about volumising products at the moment since getting my hair cut shorter. You only need 1 or 2 drops of this oil – which smells fricking amazing by the way – so this bottle will last ages!
Lola Barcelona Nail Polish in Garcia (8ml) This hot fuschia shade has been created exclusively for Birchbox. I’ve never tried a Lola Barcelona polish before, but the shade is perfect for sunny spring days.
Pommade Divine Nature’s Remedy Balm (7ml) Another brand that is totally new to me. I love multi-purpose balms; you always find one in my bag. They are so handy for chapped lips, dry cuticles, I even use them as nappy creams! This one is 97% natural, smells great and feels lovely.
Inner Me Energise Me Vitamins (28 day supply) This is the bonus product and a perfect one for me! Running around after my two boys every day means I often forget to eat, or dont have time to eat well, so I do rely on supplements to make sure I’m getting all the vitamins my body needs. Especially vitamin D which is important for breastfeeding mothers.
I’m super happy with my Birchbox this month, I love everything, REALLY love it! Did you get a box this month? Did you get anything different? What do you think of it?
If you like the look of it and want to sign up, feel free to use my referral link: birchbox.co.uk/invite/SianG. You’ll get 50 Birchbox points, equivalent to £5! The box costs £10 per month plus p+p.
With Baby J now weaning breakfast-time is taking about an hour longer. Which is fine when we don’t have any plans, but most mornings I’ve either got my course to get to or we have toddler group or some other activity planned, and so I needed to come up with something that I could take with me to feed J when we get to wherever we’re going.
I’d heard of people using bananas and oats to make cookies, especially those on dairy-free and/or gluten-free diets, so this morning I thought I’d give them a go. I didn’t have a recipe to follow, just made it up as we went along, but I noted down my measurements in case it worked. It totally worked, so I thought I would share my recipe with you.
These are perfect for baby-led weaning, and also great for toddlers and older children. Little N loved them and ate 4 of these before I could even take any photos, so I will definitely have to make more in future as snacks for him. They’re so quick and easy to make, they’re suitable for vegetarians, vegans and they can be gluten-free if you use gluten-free oats.

EASY THREE-INGREDIENT BREAKFAST COOKIES – BANANA, OAT & CINNAMON
(makes approx. 15 cookies):
Ingredients:
- 150g peeled banana
- 200g oats
- 1 tsp cinnamon
Method:
1. Preheat your oven to 180 C.
2. Line a baking sheet with non-stick baking paper.
3. In a bowl, mash the banana with a fork.
4. Add the oats and cinnamon and stir to combine.
5. Squish the mixture into little cookie shapes and place on the lined baking sheet.
6. Bake in the oven for 15 minutes for soft, chewy cookies, or 20 minutes for harder cookies.
7. Allow to cool on a wire rack before tucking in. Enjoy!
RECIPE: Easy 3-Ingredient Breakfast Cookies: Banana, Oat & Cinnamon
With Baby J now weaning breakfast-time is taking about an hour longer. Which is fine when we don’t have any plans, but most mornings I’ve either got my course to get to or we have toddler group or some other activity planned, and so I needed to come up with something that I could take with me to feed J when we get to wherever we’re going.
I’d heard of people using bananas and oats to make cookies, especially those on dairy-free and/or gluten-free diets, so this morning I thought I’d give them a go. I didn’t have a recipe to follow, just made it up as we went along, but I noted down my measurements in case it worked. It totally worked, so I thought I would share my recipe with you.
These are perfect for baby-led weaning, and also great for toddlers and older children. Little N loved them and ate 4 of these before I could even take any photos, so I will definitely have to make more in future as snacks for him. They’re so quick and easy to make, they’re suitable for vegetarians, vegans and they can be gluten-free if you use gluten-free oats.
EASY THREE-INGREDIENT BREAKFAST COOKIES – BANANA, OAT & CINNAMON
(makes approx. 15 cookies):
Ingredients:
- 150g peeled banana
- 200g oats
- 1 tsp cinnamon
Method:
1. Preheat your oven to 180 C.
2. Line a baking sheet with non-stick baking paper.
3. In a bowl, mash the banana with a fork.
4. Add the oats and cinnamon and stir to combine.
5. Squish the mixture into little cookie shapes and place on the lined baking sheet.
6. Bake in the oven for 15 minutes for soft, chewy cookies, or 20 minutes for harder cookies.
7. Allow to cool on a wire rack before tucking in. Enjoy!
For those of you who are new to this blog, my first son's birth was a long, difficult labour ending in a rather traumatic emergency Caesarean section. My second son's birth was a quick, textbook vaginal delivery.
Since Baby J’s birth, a lot of people have asked me for advice on how best to prepare for a VBAC. Aside from gaining the support of my midwife and consultant, there were a few things I did to help me prepare, and I would really recommend these to anyone else planning a VBAC.

Go through your previous birth notes
The last time I’d seen my notes was the day after Little N was born. I had them at home until I was discharged from the midwives, but I hadn’t been emotionally capable of reading them. When I met with the consultant, we went through my birth notes and there was so much that I have absolutely no memory of. Finding out that Little N had turned back-to-back during labour was a huge shock. For over a year I’d been blaming myself for not being able to push him out in time, but of course if he was back-to-back it would have been impossible for me to have delivered him quickly enough. Learning this was empowering: it wasn’t my fault, and it would be different this time.
Read Ina May’s Guide to Childbirth
Ina May’s Guide to Childbirth is a fascinating book to read. Ina May Gaskin is an American midwife, and the founder and director of the Farm Midwifery Center. Women who give birth at the Farm have incredibly low rates of intervention compared to hospital births. The book has a big section full of amazing and inspiring birth stories. It then goes on to explain why the human body is so effective at giving birth and it teaches you: how to create a safe, comfortable environment for birth in any setting; tips for maximising your chances of an unmedicated labour and birth; and, the risks of anaesthesia and caesareans. Reading this book filled me with confidence and knowledge, knowledge that became very useful when I had to argue for some of my birth choices. I still have the book now; I’m not sure that I’ll ever be able to part with it.
Listen to the Natal Hypnotherapy VBAC Preparation CDs
The Natal Hypnotherapy VBAC Preparation is a 2 CD set. The first CD helps you to overcome and let go of any negative emotions relating to your past birth experiences. This was a something I really needed. The second CD takes you on a guided visualisation through giving birth vaginally and increases your confidence, courage and ability to communicate effectively. I kept falling asleep whilst listening to the CDs and would wake up at the end when the narrator would say “you’re wide awake” (or something to that effect). It was very strange, but it was all sinking in. My confidence increased each time I listened to the CD and I felt completely calm and in control during labour, even though I was alone for most of it! http://www.natalhypnotherapy.co.uk/
Attend Daisy Birthing Active Antenatal Classes
I attended Daisy Birthing classes throughout the final trimester of my first pregnancy. I loved the classes and was so excited about doing them again during my second pregnancy. Second time around I started going to the classes at 20 weeks, although you can attend from 14 weeks, and continued right up until birth. The classes include pregnancy yoga but also teach you active birthing techniques as well as traditional antenatal information. Their birthing techniques were what helped me to get through each of my contractions without pain relief. I used the breathing techniques to cope with the pain, whilst using the “rotate to dilate” technique in between contractions. I’ve also made a few friends there, which is lovely! http://thedaisyfoundation.com/
Write a birth plan
With Little N, I didn’t write a birth plan. I thought birth was just so unpredictable that whatever I put probably wouldn’t happen anyway. For Baby J though, a birth plan was very important. Yes, birth is unpredictable, but I needed to make clear what I was and wasn’t willing to do. For example, I didn’t want continuous foetal monitoring, but the consultant did, and I wanted to use the birth pool if I could. So I compromised with the supervisor of midwives about using wireless monitors, which are also waterproof, and this went onto my birth plan. Having a plan and knowing that my wishes were going to be adhered to meant I felt that I was in control this time.
Believe in yourself
“My body is amazing.” “It was designed to do this job.” “I can do this.” These are things I kept telling myself throughout my pregnancy and even during labour. At the peak of each contraction I could hear my voice inside my own head saying, “you can do this.” I did do it, and so can you. Good luck, and don’t forget to come back and tell me all about it.
Little N’s birth story here
Baby J’s birth story: here
Preparing for a VBAC (Vaginal Birth After Caesarean)
For those of you who are new to this blog, my first son's birth was a long, difficult labour ending in a rather traumatic emergency Caesarean section. My second son's birth was a quick, textbook vaginal delivery.
Since Baby J’s birth, a lot of people have asked me for advice on how best to prepare for a VBAC. Aside from gaining the support of my midwife and consultant, there were a few things I did to help me prepare, and I would really recommend these to anyone else planning a VBAC.
Go through your previous birth notes
The last time I’d seen my notes was the day after Little N was born. I had them at home until I was discharged from the midwives, but I hadn’t been emotionally capable of reading them. When I met with the consultant, we went through my birth notes and there was so much that I have absolutely no memory of. Finding out that Little N had turned back-to-back during labour was a huge shock. For over a year I’d been blaming myself for not being able to push him out in time, but of course if he was back-to-back it would have been impossible for me to have delivered him quickly enough. Learning this was empowering: it wasn’t my fault, and it would be different this time.
Read Ina May’s Guide to Childbirth
Ina May’s Guide to Childbirth is a fascinating book to read. Ina May Gaskin is an American midwife, and the founder and director of the Farm Midwifery Center. Women who give birth at the Farm have incredibly low rates of intervention compared to hospital births. The book has a big section full of amazing and inspiring birth stories. It then goes on to explain why the human body is so effective at giving birth and it teaches you: how to create a safe, comfortable environment for birth in any setting; tips for maximising your chances of an unmedicated labour and birth; and, the risks of anaesthesia and caesareans. Reading this book filled me with confidence and knowledge, knowledge that became very useful when I had to argue for some of my birth choices. I still have the book now; I’m not sure that I’ll ever be able to part with it.
Listen to the Natal Hypnotherapy VBAC Preparation CDs
The Natal Hypnotherapy VBAC Preparation is a 2 CD set. The first CD helps you to overcome and let go of any negative emotions relating to your past birth experiences. This was a something I really needed. The second CD takes you on a guided visualisation through giving birth vaginally and increases your confidence, courage and ability to communicate effectively. I kept falling asleep whilst listening to the CDs and would wake up at the end when the narrator would say “you’re wide awake” (or something to that effect). It was very strange, but it was all sinking in. My confidence increased each time I listened to the CD and I felt completely calm and in control during labour, even though I was alone for most of it! http://www.natalhypnotherapy.co.uk/
Attend Daisy Birthing Active Antenatal Classes
I attended Daisy Birthing classes throughout the final trimester of my first pregnancy. I loved the classes and was so excited about doing them again during my second pregnancy. Second time around I started going to the classes at 20 weeks, although you can attend from 14 weeks, and continued right up until birth. The classes include pregnancy yoga but also teach you active birthing techniques as well as traditional antenatal information. Their birthing techniques were what helped me to get through each of my contractions without pain relief. I used the breathing techniques to cope with the pain, whilst using the “rotate to dilate” technique in between contractions. I’ve also made a few friends there, which is lovely! http://thedaisyfoundation.com/
Write a birth plan
With Little N, I didn’t write a birth plan. I thought birth was just so unpredictable that whatever I put probably wouldn’t happen anyway. For Baby J though, a birth plan was very important. Yes, birth is unpredictable, but I needed to make clear what I was and wasn’t willing to do. For example, I didn’t want continuous foetal monitoring, but the consultant did, and I wanted to use the birth pool if I could. So I compromised with the supervisor of midwives about using wireless monitors, which are also waterproof, and this went onto my birth plan. Having a plan and knowing that my wishes were going to be adhered to meant I felt that I was in control this time.
Believe in yourself
“My body is amazing.” “It was designed to do this job.” “I can do this.” These are things I kept telling myself throughout my pregnancy and even during labour. At the peak of each contraction I could hear my voice inside my own head saying, “you can do this.” I did do it, and so can you. Good luck, and don’t forget to come back and tell me all about it.
Little N’s birth story here
Baby J’s birth story: here
Subscribe to:
Posts (Atom)